Installing a retractable awning means measuring your patio space, mounting brackets into a stud or masonry wall, hanging the awning body, and setting the tilt angle so rain runs off instead of pooling. Most homeowners finish the job in a weekend with the right tools.
This guide covers how to install a retractable awning step by step and shows Orange County homeowners exactly when to call California Shade instead of finishing the job alone.
TL;DR
- Retractable awning installation covers seven steps: measuring, marking, drilling, mounting the brackets, hanging the unit, releasing the arm strap, and setting the tilt angle.
- Orange County homes often have stucco or brick exteriors, so the hardware and the permit rules change by wall type.
- Retract the awning once wind hits Beaufort Force 5, which the National Weather Service places at 19 to 24 mph.
- California Shade installs retractable awnings across Orange County and offers a free in-home consultation at (714) 502-5501.
What Tools Do You Need to Install a Retractable Awning?
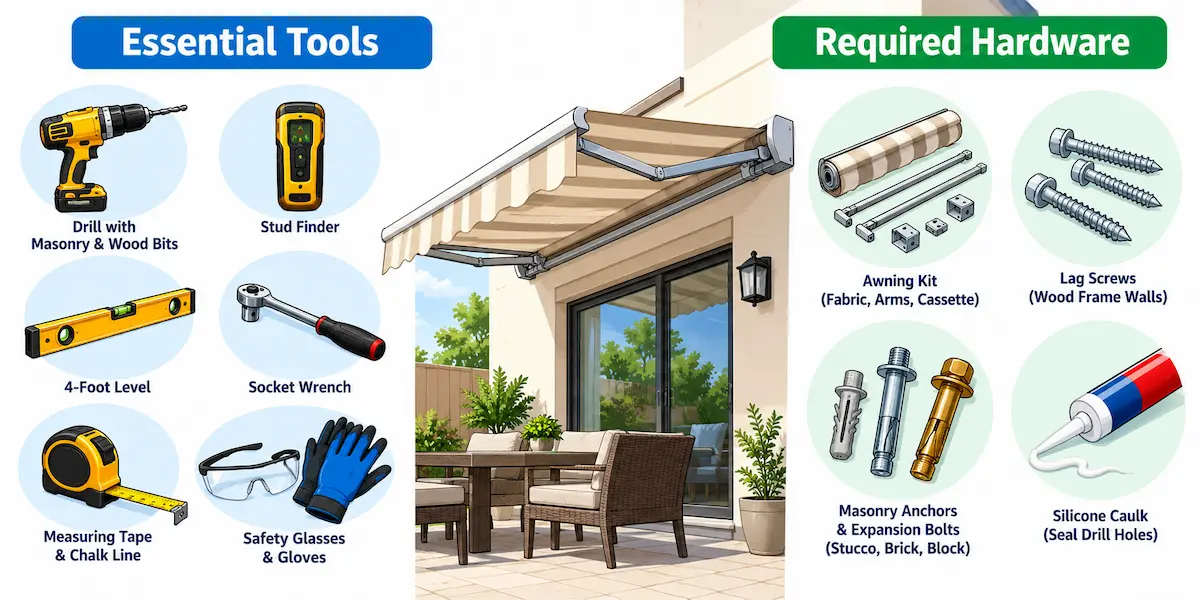
You need seven core tools and four hardware categories to install a retractable awning. Gather everything before you start so the job doesn’t stall halfway through.
Tools:
- Electric drill with masonry and wood bits
- Stud finder
- 4-foot level
- Socket wrench
- Measuring tape and chalk line
- Safety glasses and gloves
Hardware:
- Awning kit (fabric, arms, cassette or open frame)
- Lag screws for wood-frame walls
- Masonry anchors and expansion bolts for stucco, brick, or block
- Silicone caulk to seal drill holes
Many Orange County homes sit on stucco over a wood or block frame. Masonry anchors and expansion bolts, not lag screws alone, are what actually hold the bracket to the wall. Awnings mounted without the right anchor pull loose within a season.
How Do You Prepare an Orange County Home Before Installing a Retractable Awning?
Preparation covers three things: your wall type, city or HOA approval, and the safety risk of the tensioned arms.
| Wall Type | Hardware Needed | Key Risk |
| Stucco | Masonry anchors through to structural framing | Stucco alone cracks under load |
| Wood fascia | Lag screws into studs | Thin or rotted fascia won’t hold the weight |
| Brick or block | Expansion bolts and masonry anchors | Mortar joints crumble if you drill into the joint instead of the brick face |
| Vinyl siding | Lag screws into studs behind the siding, plus mounting blocks | Vinyl alone bends and cracks |
Most Orange County cities, including Irvine, Anaheim, and Huntington Beach, require a building permit for a permanently mounted awning. Many HOAs also require architectural approval before installation. Check with your city’s planning department and your HOA’s architectural committee before you drill a single hole.
The awning’s support arms ship under spring tension. Removing the safety strap before the unit is fully mounted lets the arms snap open without warning. Keep a second person nearby to hold the arms steady during that step.
How Do You Install a Retractable Awning Step by Step?
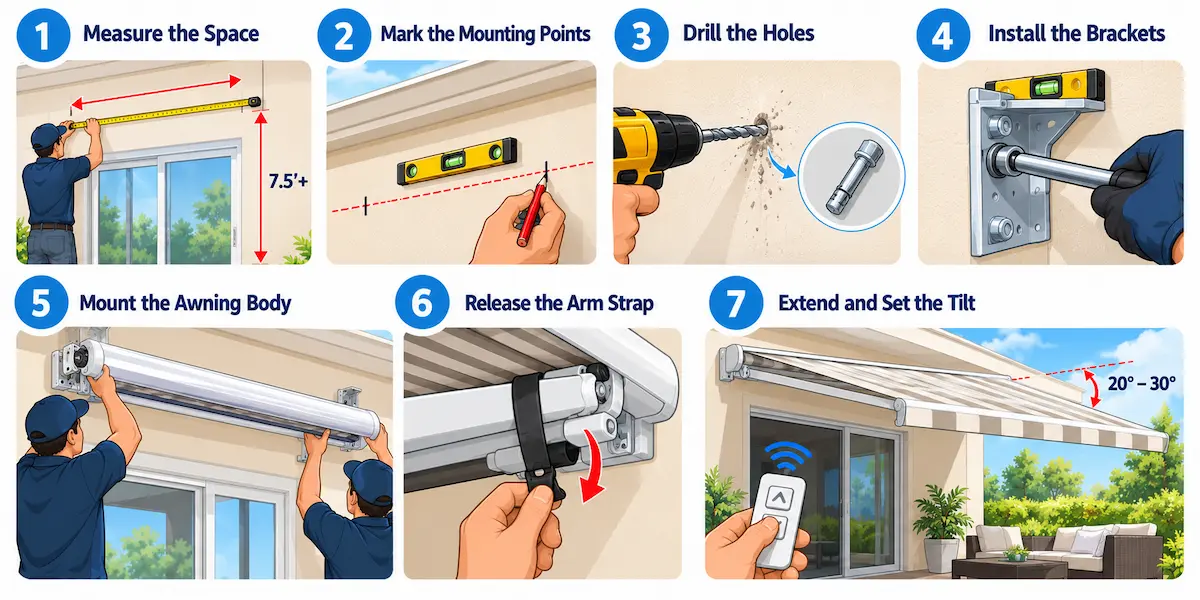
Installation breaks down into seven steps: measuring, marking, drilling, mounting the brackets, hanging the awning, releasing the arm strap, and setting the tilt.
- Measure the space. Measure the patio width and the projection you want, then confirm at least 7.5 feet of clearance above the ground or deck.
- Mark the mounting points. Use a stud finder on wood-frame walls, or lay out masonry anchor points with a chalk line, keeping both sides level.
- Drill the holes. Drill pilot holes sized to your wall type from the table above, then seal each hole with silicone caulk before inserting hardware.
- Install the brackets. Tighten the brackets with a socket wrench until they sit flush against the wall, checking level as you go.
- Mount the awning body. Lift the awning with a second person and hook it onto the brackets, then tighten every bolt.
- Release the arm safety strap. Hold the arms steady while a second person removes the strap slowly.
- Extend the fabric and set the tilt. Crank the awning open by hand, or use the remote on motorized units, then set the pitch to roughly 20 to 30 degrees so rain sheets off instead of pooling.
What Mistakes Should You Avoid When Installing a Retractable Awning?
The most common mistakes are stripped screws, unsealed drill holes, uneven brackets, and a tilt angle set too flat.
- Overtightening lag screws strips the threads and leaves the bracket loose.
- Skipping silicone caulk on drill holes lets water into the wall, which leads to rot behind stucco and siding.
- Mounting one bracket even slightly higher than the other puts the whole frame under uneven stress.
- Setting the tilt angle too flat traps rainwater on the fabric and pulls the frame down over time.
When Should You Call California Shade Instead of Installing an Awning Yourself?
Call a professional installer when the mounting surface is masonry only, the unit is motorized, or the awning attaches to a roofline instead of a wall.
Motorized awnings need a dedicated outlet and, in many cases, a wired wind sensor, which is electrical work outside most DIY skill sets. Roofline mounting changes the load path across your rafters and often needs a licensed contractor to keep your warranty and your city permit valid.
California Shade installs both manual and motorized awnings across Orange County, from Irvine to Newport Beach, and every install includes the permit paperwork and HOA documentation your project needs. Call (714) 502-5501 to book a free in-home consultation, or browse all outdoor shades if you’re weighing an awning against another shade option first.
How Do You Maintain a Retractable Awning After Installation?
Maintenance comes down to four habits: retract in high wind, clean the fabric twice a year, lubricate the arm joints annually, and inspect the hardware each spring.
- Retract the awning once wind reaches Beaufort Force 5. The National Weather Service’s Beaufort wind scale places that range at 19 to 24 mph, the point where small trees begin to sway.
- Clean the fabric with mild soap and water in spring and fall to stop mildew.
- Lubricate the arm joints once a year with silicone spray, not oil, which attracts dust.
- Check every bolt and bracket each spring. Orange County’s coastal air corrodes hardware faster than inland areas.
FAQ
How Long Does Retractable Awning Installation Take?
Most retractable awning installations take four to six hours for a single unit on a wood-frame wall, and closer to a full day on stucco or masonry, where anchor work takes longer.
Can You Install a Retractable Awning on Stucco?
Yes, you can install a retractable awning on stucco, but the brackets need to reach the structural framing behind the stucco with masonry anchors, not the stucco layer alone.
Do You Need a Permit to Install an Awning in Orange County?
Most Orange County cities require a building permit for a permanently mounted retractable awning, and many HOAs require separate architectural approval before installation.
Is a Manual or Motorized Retractable Awning Easier to Install?
A manual retractable awning is easier to install because it skips the electrical wiring and wind sensor setup that motorized units need.
How Much Wind Can a Retractable Awning Handle?
A retractable awning should be retracted once wind speeds reach 19 to 24 mph, the range the National Weather Service classifies as Beaufort Force 5.
Conclusion
Knowing how to install a retractable awning comes down to picking the right hardware for your wall, following Orange County’s permit rules, and setting the tilt angle correctly once the unit is up. If any part of that list, from a stucco wall to a motorized unit, pushes the project past a weekend job, California Shade handles installation across Orange County and backs every job with a warranty. Call (714) 502-5501 to schedule a free in-home consultation, or check how much awnings cost before you budget the project.